How long should your tyres last & how to change them
How long your tyres last has a lot to do with your driving style. A tyre that’s in good condition has signs of even wear across the tread and wall of the tyre. Uneven wear can signal bigger problems with the car itself so it is worth keeping an eye on the wear of your tyres. It is normal for front tyres to wear faster than rear tyres but as a rule, tyres should be replaced every 5-6 years at least! most people will change their tyres after 10,000 – 50,000 miles depending on how you drive.
Do you opt for brand new or part worn tyres when replacing a wheel?
The anatomy of a tyre
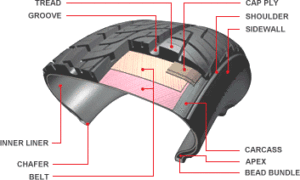
The humble car tyre has a lot of components making it perfect for the job of supporting the car to move effectively. Here we’ll take you through the key elements of your car’s tyres so you can recognise which parts to inspect when maintaining your vehicle.
This diagram is courtesy of Mashal Tyre where you can find full descriptions of the cars parts.
What parts make up a tyre?
 The outer part of the tyre is known as the sidewall. This is what makes the structure rigid and protects the inner mechanics of the tyre. The sidewall improves performance by allowing the tyre to expand and compress depending on the road.
Then there’s the tread which is another feature of the outer visible part of the tyre. This is the part which has the contact with the road. Because it has contact with the road the tread must withstand extremes in weather and terrain. It features patterned grooves to help the tyre grip the road.
The tyre shoulder is the section from the edge of the tread to the upper part of the sidewall. It needs to offer good heat dispersal.
The tyre carcass is the inner cord of the tyre that supports the weight and absorbs impact. As such it has to resist fatigue caused by the constant flexing and compression.
Types of tread
There’s a variety of tyres on the market, each with a different price tag. But what are the main differences? Other than size, you’ll find that the tread patterns vary too.
The groove of the tyres tread is a fundamental element in judging the quality of a tyre. This is what aids in braking and improves the driving performance of a tyre. The depth and design of the groove can also impact on road noise. The finer groove in a tyre is known as the sipe. This also enhances braking and driving capabilities of the car. For winter, the sipe creates a biting effect and improves control and braking on icy or wet roads.
Read a breakdown of the tyre tread types and their pros and cons.
Why do I need to check my tyres?
Tyres are the only barrier between your car and the road making them the most important safety feature on your car. Checking the tread for wear regularly is so important. If your tyres are worn below the legal limit you are not only risking a blow-out which can cause major damage to your car, and a potentially nasty accident. But you’re also risking a fine of £2,500 and three points on your licence. This is more than the fine for things like talking on a mobile phone, which should be a pretty good indicator that it’s even more dangerous!
How to check your tyres
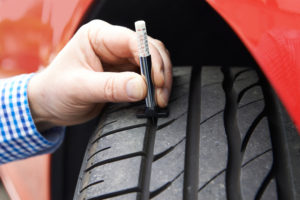
 Checking your tyres is easy. Firstly, just check there are no cracks or grazed areas on the tyre. Then, take a 20p coin and insert it into one of the grooves of the tread. If the outer border printed on the coin is visible then you’re all set! If the tyre conceals this border then you’re in trouble and need to replace your tyre as soon as possible. Be sure to drive carefully to the garage. Having a tyre blow at high speed increases the chance of the accident causing serious injury to you or others.
What causes tyre wear?
There are several reasons why your car tyres might wear more quickly than they should. These include:
- Bad or reckless driving. Doing stunts like burnouts and doughnuts, cornering and braking aggressively will wear your tyres down quickly.
- The position of the tyres. Front tyres will wear faster than those at the rear because of steering. It’s important to rotate the position of your tyres every few months to ensure they wear evenly.
- If you drive at high speeds this will wear the tyres much quicker
- Excess load increases wear and tear.
- If your tyre pressures aren’t right.
How do I change my tyres?
Changing a tyre can be quite daunting. Especially knowing how important the tyres are as a safety feature on your car. This step by step tutorial will help make it a simple process.
Step by step tutorial to change a tyre:
 Preparing to remove the old wheel
- Make sure your car is parked on a flat and even surface. Ensure the handbrake is on and the engine is off.
- If you’re on a busy road or the side of the motorway you should place a warning triangle a few feet away from your vehicle to warn oncoming traffic that you are there. If it’s dark, ensure you wear a bright or reflective jacket for added safety.
- The spare wheel is located in the boot of your car, often concealed under a sheet of fabric. There should also be a jack and a tyre wrench within the boot casing of the tyre.
Begin removing the old wheel
- Loosen the wheel nuts located in the centre of the hubcap (there are usually 5 per tyre) using the wrench.
- Find the groove where the jack is meant to be used. This is usually under the chassis of the car just off centre. If you jack your car in the wrong position it can cause serious damage to the vehicle. Place the jack under the car in this position and slowly raise the car off the ground. The jack will either be a pump (push down) motion or a rotate motion.
- Once the car is elevated and the tyre is a few centimetres off of the ground you can finish removing the wheel nuts.
- Once the wheel nuts have been removed you can lift the tyre off. Be careful the tyre can be deceptively heavier than you might have first thought. Lay it to the side flat on the ground so it can’t roll away and become a hazard.
Fitting the new wheel
- Take the new wheel and put it in place of the old one. Partially re-attach the wheel nuts.
- Using the jack gently lower the car until the car is flat on the ground.
- Finish tightening the wheel nuts and tidy away your tools. Place the old wheel in the boot.
- Make sure the wheel is on correctly and the wheel nuts are tight.
Then you’re ready to roll…… literally.

